Test and Verify
The items under Test and Verify in the Left column menu allows you to manage users, channels, devices and messaging (push templates, settings, logs and more).
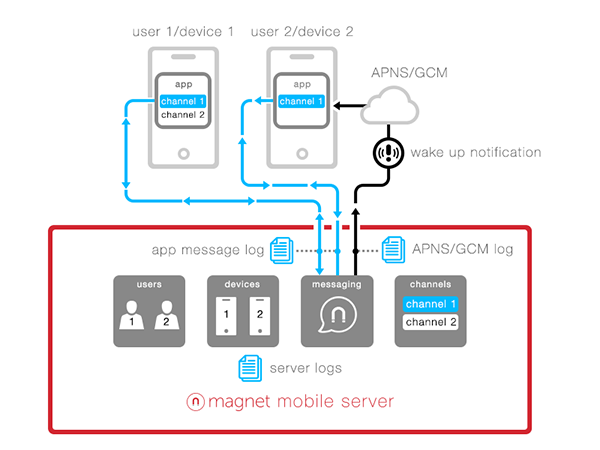
The following diagram illustrates how the Magnet Mobile Server works with all these parts:
Users
Select Users in the Left column menu to view the list of users registered or requesting to use the app. Users can be added, edited, removed, deactivated or sent messages in this page.
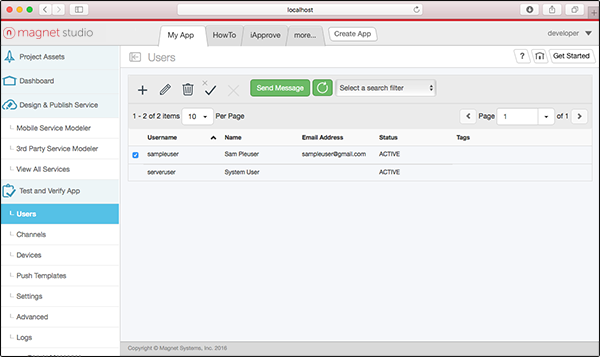
The Users Toolbar at the top of the page provides the following:

- Add User
- Edit User
- Delete User
- Activate/Deactivate user
- Approve/Reject user
- Send an in-app message to the selected user(s)
- Refresh Search
- Filter options for search
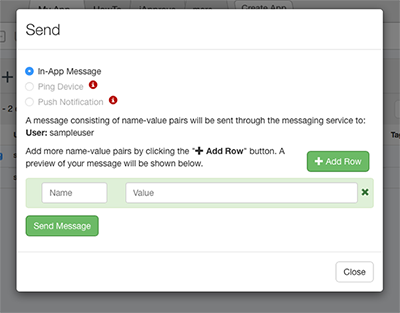
Key/Value Pair
A key/value pair can be sent to the mobile app. Select the Send Message button to open the Send In-App Message dialog.
The field marked "Name" is the key and "Value" is the value.
Channels
A channel is a special message queue to which publishers send events and from which subscribers receive events. Channels are global and are associated with a messaging app. Pre-defined channel names include topics for supported mobile device platforms by Magnet Message. The messaging web interface provides a UI for managing channels (select Channels in the Left column menu). In addition, mobile endpoints can manage, subscribe and publish to channels programmatically using Magnet Message APIs.
To make it easier to search for channels, you can add keyword "tags" to channels. See Edit a Channel below for details.
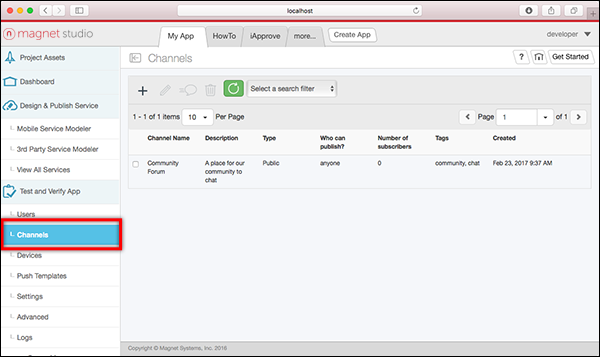
- Select the App from the messaging web interface and open the Channels page.
- Use the Channels page to view the channels for an app. This screen provides the following information for each channel:
- Channel Name: Name for the channel
- Description: Brief description of channel
- Type: Channel type
- Who can publish?: Type of user allowed to publish to the channel
- Number of subscribers: Number of subscribers for the channel
- Tags: Keyword tags assigned to the channel
- Created: Channel creation date and time
- Max Items: Maximum number of published items that can be persisted in storage
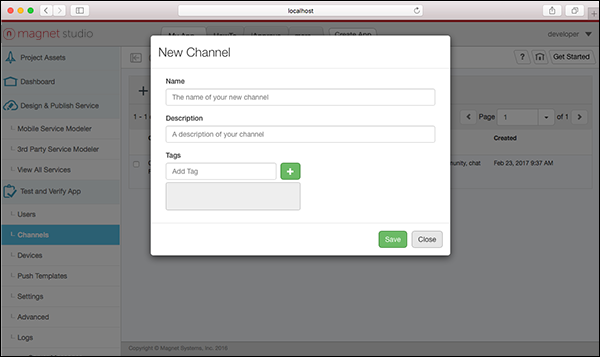
Create a New Channel
- Click the + icon to open the New Channel window.
- Enter a name in the Name field. This is required.
- If desired, add a description in the Description field.
- If desired, add tags by typing a tag name into the Tag field, and then press the + button to add the tag to the list. Use the Delete (trash) icon next to any tag to remove the unwanted tag. You can add multiple tags to a channel.
- When you are finished, press the Save button to create the channel.
Channel Name Limitations
Note that channel names have the following limitations:
- "com.magnet" is reserved by the messaging server for system use.
- All channel names must be less than or equal to 50 characters.
- Channel names can only use the following character set: 0-9, a-z, period (.), dash (-), and underscore (_).
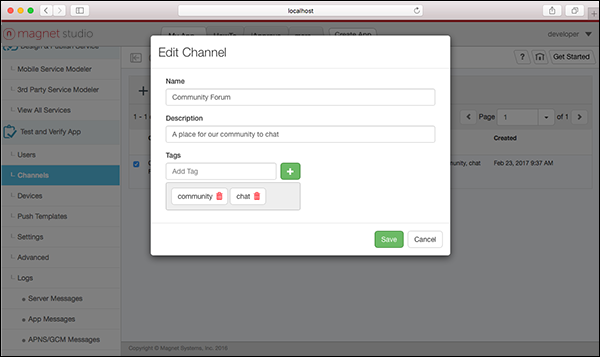
Edit a Channel
- Select a channel to edit by clicking the checkbox next to a topic.
- Click the Edit (pencil) icon to display the Edit Channel window.
- Update the following fields as desired: Name, Description, Tags (add and remove tags as desired). Then press the Save button to save the changes.
Delete a Channel
- Select a channel to delete by clicking the checkbox next to a channel.
- Click the Delete (trash) icon to delete the topic.
Publish a Channel Event from the Messaging Web Interface
- Click the Publish button in the Channel page next to desired topic.
- Enter your message in the window that appears and click the Publish Message button to publish to the subscriber list.
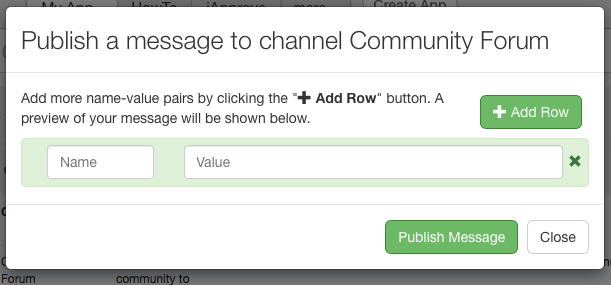
- After the publish action is performed, a "Your message has been sent!" confirmation message appears for several seconds.
- Click Close if you are finished sending messages.
Devices
View Registered Mobile Devices
Mobile devices registered for an app are shown in the Endpoints page. Endpoints can be registered through the messaging APIs as described in Creating Your First Android Chat App and Creating Your First iOS Objective-C App or Creating Your First iOS Swift Chat App. When a device is registered, its status is marked as ACTIVE.
This screen provides the following read-only information for each device:
- Device ID: Unique mobile device identifier generated by Magnet Message
- Device Name: Derived friendly name based on user ID and mobile device model information
- OS: Android or iOS
- Token: GCM or APNS client token, if available
- Status: ACTIVE or INACTIVE. ACTIVE means the device is registered in Magnet Message.
- User ID: Unique user ID specified by the mobile client or randomly generated for guest access users
Push Templates
A push notification is sent when the user is offline. A push template controls what will be shown when push notifications are received.
Example template:
mmx.pubsub.notification.type=push\nmmx.pubsub.notification.title=\nmmx.pubsub.notification.body=${msg.from} voted on ${msg.content.question[0..*30]}\nmmx.pubsub.notification.sound=default\nmmx.pubsub.notification.badge=messages\n
The default templates are:
- DefaultPollAnswerConfig: Enables modification of the answer template
- DefaultPollConfig: Enables modification of the question template
- Default-config: Enables modification of the message body
We can also create a custom template by clicking the Create Template.
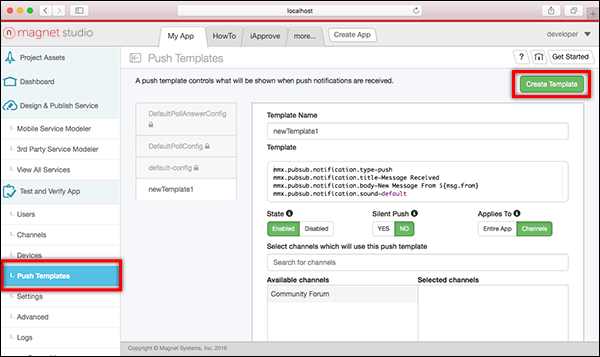
Configure the following fields:
- Template Name: Names the template
- Template: Creates a design for the template
- State: Enables ("Enabled") or disables ("Disabled") use of the template
- Silent Push: Sends template with sound ("Yes") or silently ("No")
- Applies To: Configures the application of the template to the entire application ("Entire App") or to a particular channel ("Channels")
- Select channels which will use this push template: Enter a search term to search for a particular channel that will use the template.
- Available channels and Selected channels: Select a channel from the "Available channels" list and move it to "Selected channels" if it will use the template.
Click the Save button to save any changes made.
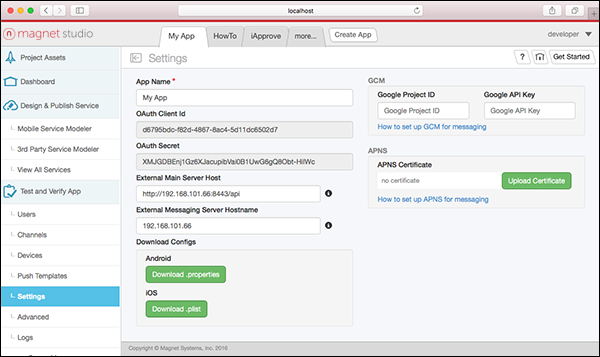
Settings
When a new app is created the following items are automatically generated:
- App Name: The name of the app. It can be changed later, but no two apps can have the same name.
- App ID: A unique identifier for the app. It is required when using the messaging SDK to communicate with the server. This identifier cannot be changed.
- Magnet Message API Key: This is generated when you create the app. It is required when using the messaging SDK to communicate with the server. This identifier cannot be changed.
- Anonymous Access Secret: This secret is required for user creation. It is used for anonymous access in combination with the app ID.
NOTE: When these settings are updated, make sure the properties file (Android) or plist file (iOS) in your mobile app source code matches.
Use the Settings page to set up your mobile client app so it can establish a secure connection with the messaging server. A secure connection requires the following:
- Use the automatically generated settings in your mobile client app code to connect to the messaging server. This includes the App ID, Magnet Message API Key, and Anonymous Access Secret.
- Enter the settings from Google Cloud Messaging (GCM) or Apple Push Notification Service (APNS) to set up your mobile app with either service. This is required to ensure delivery of in-app messages when the mobile client app is not running. Push notifications and pings are also sent through GCM or APNS directly to mobile devices. Note that you will have to register with GCM or APNS first.
Click the Save button to save any changes made.
Click Delete App to delete the selected messaging app.
WARNING: An app can not be recovered after it is deleted.
See Creating Your First Android Chat App and Creating Your First iOS Objective-C App or Creating Your First iOS Swift Chat App for examples of setting up the your app to connect to the messaging server.
Enable Push Notifications with GCM or APNS
Obtain GCM Settings
For Android apps, enable push notifications with GCM using the following two fields:
- Google Project ID: Enter the Google Project Number obtained during GCM registration.
- Google API Key: Enter the Google "Server API key" obtained during GCM registration for the respective Google Project ID.
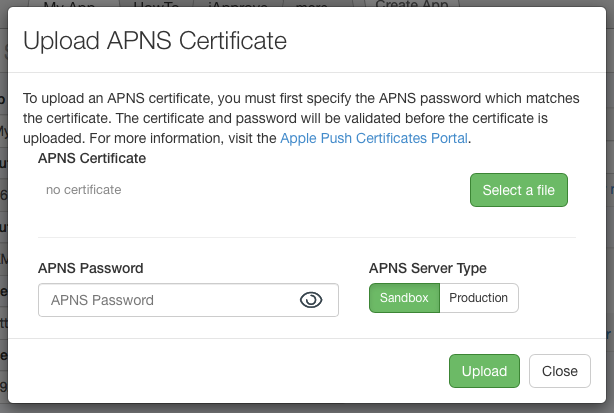
APNS Certificate for iOS
For iOS apps, enable push notifications with APNS. Click the Upload Certificate button and enter the following information in the window that displays:
- APNS Certificate: Click the Select a file button and navigate to the folder that contains your APNS certificate (.p12 file). You will need to supply your APNS password to upload the file.
- APNS Password: Enter your APNS password for the certificate.
- APNS Server Type: Use this toggle to set the APNS server type to use ("Sandbox" or "Production").
- Upload: Click Upload to upload the certificate.
- Close: Click Close to close the window.
Advanced
Select Advanced in the Left column menu to view options for configuring more advanced settings for the application.
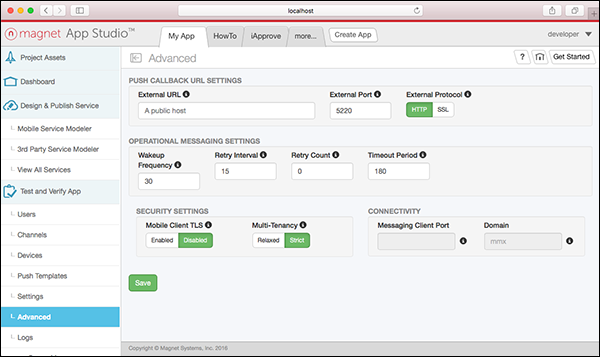
Push callback URL settings
- External URL: The public host to be used by mobile clients for acknowledging push notification
- External Port: The public port to be used by mobile clients for acknowledging push notification
- External Protocol: The public protocol to be used by mobile clients for acknowledging push notification it could be either HTTP or SSL
Operational Messaging Settings
- Wakeup Frequency: Frequency in seconds for sending a wakeup to a device
- Retry Interval: The time interval in minutes between consecutives messages retry attempt
- Retry Count: The count for number of times a message delivery will be attempted
- Timeout Period: The time period in minutes after which server will stop attempting sending message
Security Settings
- Mobile Client TLS: Enables or disables security for mobile clients.
- Multi-Tendency: Sets the accessibility mode ("Relaxed" or "Strict"). In "Relaxed" mode messaging apps are accessible by all developers. In "Strict" mode messaging apps are accessible only by developers who created the app.
Connectivity
- Messaging Client Port: The messaging port mobile clients will use for communication with the messaging server.
- Domain: An identifier representing the network gateway or ‘primary’ server to which mobile clients connect. It is disabled for editing and it is always mmx.
Logs
This page provides a list of server messages. To filter the list:
- Click the Select a search filter field to filter the message list using any of the following criteria:
- Search by Name
- Search by Message
- Search by Log Level
- Click the Refresh button to filter the list.
The history for server logs logged by the Magnet mobile server is saved in the Server Messages page. The history for each notification is saved.
- Level: Defines the minimum set of levels recognized by the system (i.e.,
OFF, FATAL, ERROR, WARN, INFODEBUG and ALL). The level may be sub classed to define a larger level set.
Types of Levels
The following level types are provided:
ALL: All levels including custom levelsDEBUG: Designates fine-grained informational events that are most useful to debug an applicationERROR: Designates error events that might still allow the application to continue runningFATAL: Designates very severe error events that will presumably lead the application to abortINFO: Designates informational messages that highlight the progress of the application at coarse-grained levelOFF: The highest possible rank (used to turn off logging)TRACE: Designates finer-grained informational events than DEBUGWARN: Designates potentially harmful situations
The following log information is provided:
- Created at: When the server created the log
- Name: What processor the log came from
- Stack trace: Shows all previous server commands before the server crashed
- Type: Kind of log
- Identifier: Unique ID given to log
- Tag: Name
APNS/GCM Messages
The history for all in-app messages sent using Magnet Message is saved in the Message Log page. The following history information is saved for each notification:
- State: Notification state
- Date Sent: When the notification is sent by the sender
- Date Acknowledged: When the notification enters "RECEIVED" state
- Type: Notification type ("push" or "ping")
- Recipient Device Id: Mobile device ID of the receiver
- Message ID: Uniquely generated message ID
To filter the list:
- Click the Select a search filter field to filter the message list using any of the following criteria:
- Search by Date sent
- Search by state
- Click the Refresh button to filter the list.
The history for server logs logged by the Magnet mobile server is saved on the Logs page. The history for each notification is also saved.