Push Templates
By default, Magnet Max notifies offline MMXChannel subscribers using push notifications (APNS, GCM). Push templates are FreeMarker templates that allow you to customize push notification content on the basise of the app, MMXChannel, and MMXMessage. For example, pushes can contain more detailed information like: "John just replied to your message" or "Jane just posted a photo". This allows users to get more detailed and useful pushes in a few steps.
- First Configure your app to use Magnet Max. See Getting Started.
- Then set up your app for push. See Set up APNS.
- Next, log on to the App Studio. See Developer App Studio.
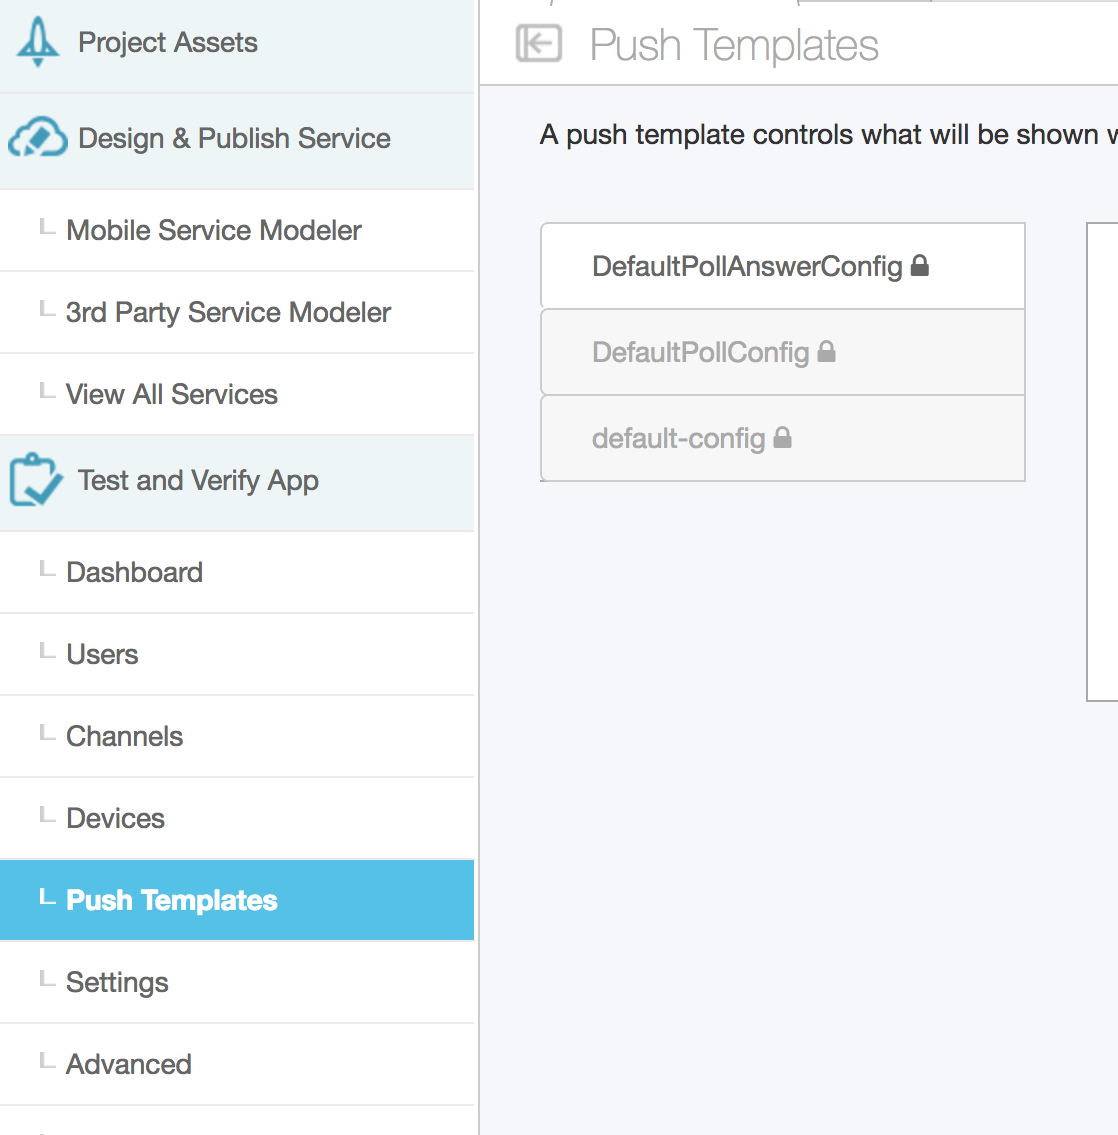
- Once logged on, select the button labeled Push Templates located in the panel on the left.
The default system push templates will be used if no other push templates are specified. Push templates always use the most descriptive template available and will override any global push templates. For example, if an app has custom a push template named "MyAppTemplate" and an MMXChannel has an associated push template named "MyChannelTemplate", the channel template will be used. On the other hand, if the MMXChannel does not have an associated push template, the app level template "MyAppTemplate" will be used. The same rule applies for MMXMessages.
App Template
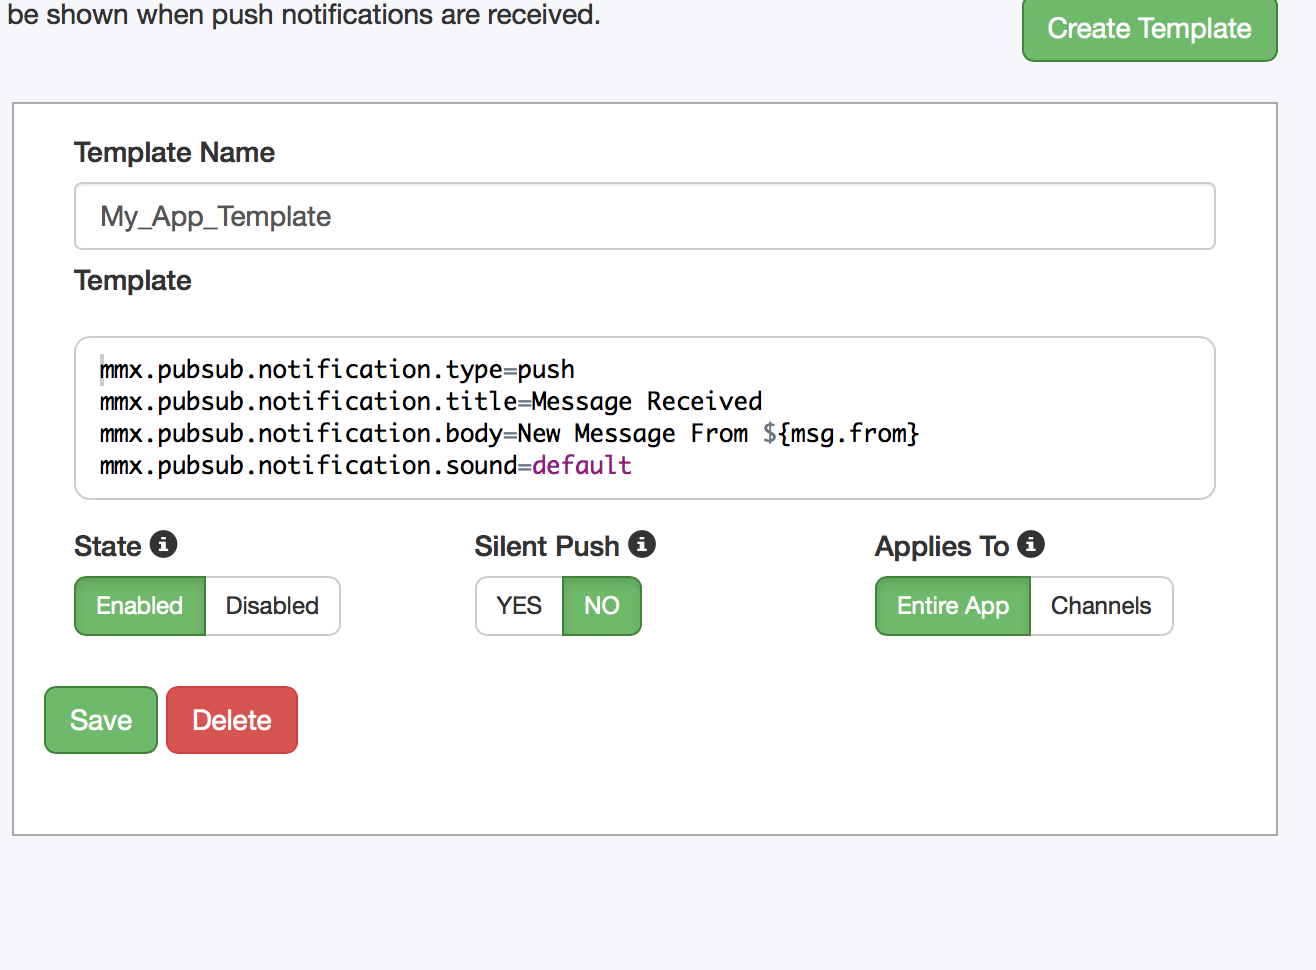
To create an app-wide template, select the Create Template button located in the top right corner of the Magnet Studio console and enter "MyAppTemplate" as the name for your template. Use the FreeMarker syntax to customize your push notification. (See Push Template Context Variables for accessible variables.)
mmx.pubsub.notification.type=push
mmx.pubsub.notification.title=${application.name}
mmx.pubsub.notification.body=New Message
mmx.pubsub.notification.sound=default
Channel Template
To create channel template, select the Create Template button located in the top right corner and enter "MyChannelTemplate" as the name for your template. In the Applies To section, select channels. Use the FreeMarker syntax to customize your push notification for MMXChannels. (See Push Template Context Variables for accessible variables.)
mmx.pubsub.notification.type=push
mmx.pubsub.notification.title=${channel.name}
mmx.pubsub.notification.body=${msg.from} is saying something
mmx.pubsub.notification.sound=default
Try out Templates
Now that you have two templates defined, you can try them out.
Create a new project in XCode and add this code, for creating a user, to the default view controller class.
- (void)createUser {
dispatch_group_t dispatch_group = dispatch_group_create();
MMUser *user = [[MMUser alloc] init];
user.firstName = @"John";
user.lastName = @"Doe";
user.userName = user.firstName;
user.password = user.firstName;
dispatch_group_enter(dispatch_group);
[user register:^(MMUser * user) {
dispatch_group_leave(dispatch_group);
} failure:^(NSError * error) {
if (error.code == 409) {
dispatch_group_leave(dispatch_group);
}
}];
dispatch_group_notify(dispatch_group, dispatch_get_main_queue(), ^{
NSURLCredential *credential = [NSURLCredential credentialWithUser:user.userName
password:user.password
persistence:NSURLCredentialPersistenceNone];
[MMUser login:credential success:^{
[MMX start];
//call method that sends messages
[self sendMessage];
} failure:^(NSError *error) {
NSLog(@" error %@", error.localizedDescription);
}];
});
}
Now create a new method to send messages.
- (void)sendMessage {
//create channels and send messages here
}
In the sendMessage method add the code to create one channel with the default push config and one channel with a custom push config.
//Channels to be populated
__block MMXChannel *channel1;
__block MMXChannel *channel2;
//create dispatch_group for loading channel objects
dispatch_group_t dispatch_group = dispatch_group_create();
//Let’s first get the channel that will use the app level template*(by default)*.
//Unspecified push config, will use the default Push template
dispatch_group_enter(dispatch_group);
[MMXChannel channelForName:@"MyChannel" isPublic:YES success:^(MMXChannel *channel) {
if (channel.isSubscribed) {
//add channel and leave group
channel1 = channel;
dispatch_group_leave(dispatch_group);
} else {
[channel subscribeWithSuccess:^{
channel1 = channel;
dispatch_group_leave(dispatch_group);
} failure:nil];
}
} failure:^(NSError *error) {
[MMXChannel createWithName:@"MyChannel"
summary:@"This is a test channel"
isPublic:YES
publishPermissions:MMXPublishPermissionsAnyone
success:^(MMXChannel *channel) {
//add channel and leave group
channel1 = channel;
dispatch_group_leave(dispatch_group);
}
failure:^(NSError * _Nonnull error) {
NSLog(@" error %@", error.localizedDescription);
}];
}];
//Let’s get the second channel that uses the custom template.
//Specifies custom Push template
dispatch_group_enter(dispatch_group);
[MMXChannel channelForName:@"MyChannel2" isPublic:YES success:^(MMXChannel *channel) {
if (channel.isSubscribed) {
//add channel and leave group
channel2 = channel;
dispatch_group_leave(dispatch_group);
} else {
[channel subscribeWithSuccess:^{
channel2 = channel;
dispatch_group_leave(dispatch_group);
} failure:nil];
}
} failure:^(NSError *error) {
[MMXChannel createWithName:@"MyChannel2"
summary:@"This is my second test channel"
isPublic:YES
publishPermissions:MMXPublishPermissionsAnyone
subscribers:nil
pushConfigName:@"MyChannelTemplate"
success:^(MMXChannel *channel) {
//add channel and leave group
channel2 = channel;
dispatch_group_leave(dispatch_group);
}
failure:^(NSError * _Nonnull error) {
NSLog(@" error %@", error.localizedDescription);
}];
}];
Now that we have two channels created append the following code to the sendMessage method to send a message to both channels.
//wait for channel objects to be populated
dispatch_group_notify(dispatch_group, dispatch_get_main_queue(), ^{
NSDictionary *content = @{@"content_key":@"Hello World"};
[MMX stop];
MMXMessage *message1 = [MMXMessage messageToChannel:channel1 messageContent:content];
MMXMessage *message2 = [MMXMessage messageToChannel:channel2 messageContent:content];
[message1 sendWithSuccess:^(NSSet<NSString *> *invalidUsers) {
NSLog(@"message 1 success");
} failure:^(NSError *error) {
NSLog(@" error %@", error.localizedDescription);
}];
[message2 sendWithSuccess:^(NSSet<NSString *> *invalidUsers) {
NSLog(@"message 2 success");
} failure:^(NSError *error) {
NSLog(@" error %@", error.localizedDescription);
}];
});
There is one last thing to do. In the viewDidLoad method call our createUser method.
- (void)viewDidLoad {
[super viewDidLoad];
[self createUser];
}
Important: If you have not done so already, configure your app for push notifications. Set up APNS
Build and run the app on a physical device. (After launch, press the Home button to background your app, and then bring up the device's lock screen).
Update the createUser method and enter a new first name (e.g., user.firstName = "Jane").
Build and run the app on the simulator.
You should see two push notifications like the ones below on the physical device.
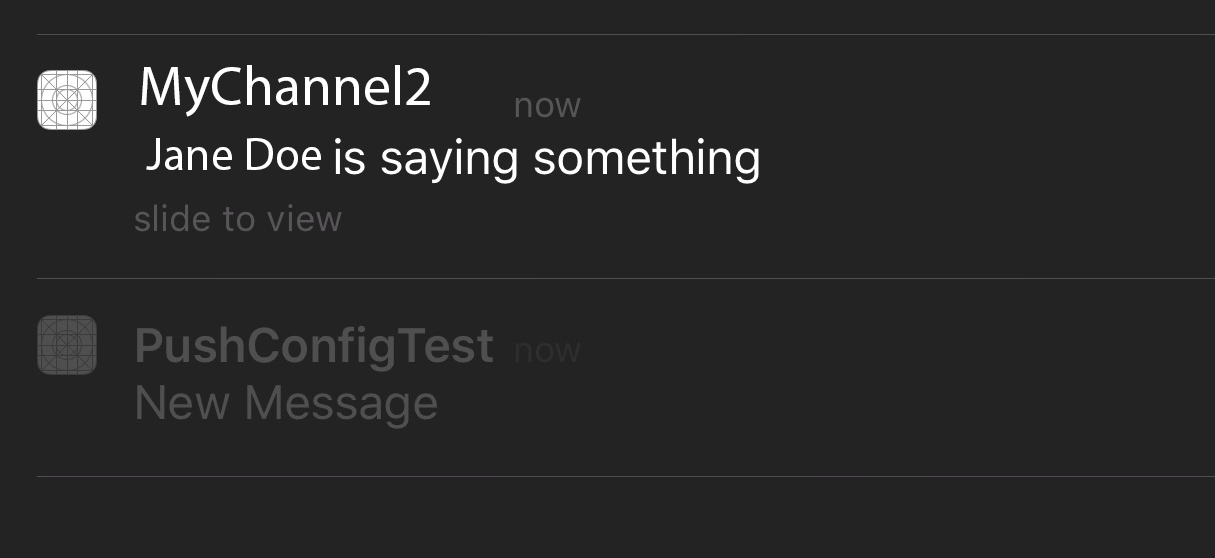
Using Push on an MMXMessage.
Using push templates on an MMXMessage is similar to using one on a channel. Go back to the App Studio create another push template following the steps above; name the push template "MyMessageTemplate". In the Applies To section select "Channels". (See Push Template Context Variables for accessible variables.)
Create custom values for your template or use the one below.
mmx.pubsub.notification.type=push
mmx.pubsub.notification.title=Message From ${msg.from}
mmx.pubsub.notification.body=${msg.content.content_key} - ${msg.date?datetime}
mmx.pubsub.notification.sound=default
Update the sendMessage method we created earlier.
Replace these lines of code.
MMXMessage *message1 = [MMXMessage messageToChannel:channel1 messageContent:content];
MMXMessage *message2 = [MMXMessage messageToChannel:channel2 messageContent:content];
With these lines of code.
MMXMessage *message1 = [MMXMessage messageToChannel:channel1 messageContent:content];
MMXMessage *message2 = [MMXMessage messageToChannel:channel2
messageContent:content
pushConfigName:@"MyMessageTemplate"];
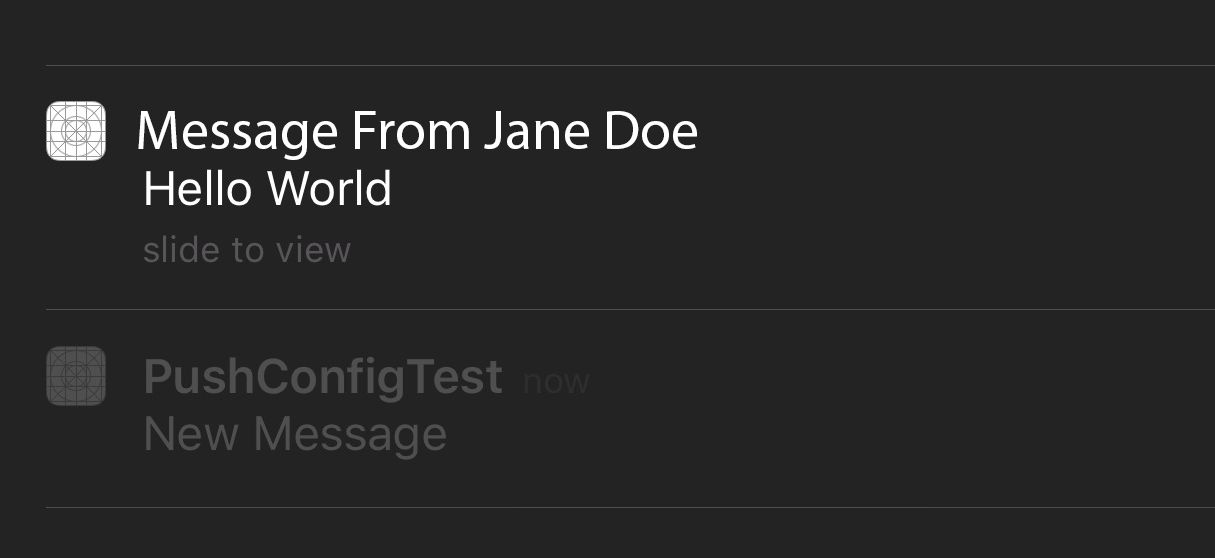
Build and run the app again on the simulator.
You should see two push notifications like the ones below, on the physical device.
Push Template Context Variables
| Object |
variable |
Type |
Description |
| application |
|
name |
String |
Server side application name |
| channel |
|
name |
String |
Channel name |
|
desc |
String |
Channel description |
| msg |
|
from |
String |
User first and last name ("FirstName LastName") |
|
date |
java.util.Date |
Base on server locale; user locale is not available. Use date/time/datetime formatter as ${msg.date?datetime} |
|
content |
java.util.Map |
Dictionary containing MMXMessage messageContent (e.g. ${msg.content.content_key}) |