Set Up APNS for Messaging
Magnet Message supports Apple Push Notification Service (APNS) for iOS push notifications. To enable your iOS device to receive the APNS messaging service, you must register with the Apple iOS developer program. If you have not done this skip down to the Set Up Your Application with Apple iOS Developer section below.
We use your Push SSL Certificate to communicate with Apple’s push notification servers. The private key is stored in the messaging server. Apple uses the public key to authenticate us on your behalf.
Integrate APNS into Magnet Message
- In the messaging web interface, select your app from the pull-down menu and open the Settings screen.

- Click the Upload Certificate button under APNS.
- Click Select a file and choose an APNS certificate file (.p12 extension).
- Enter the certificate password for your file (.p12 extension).
- Click Upload to save these settings.
Updating your App to Handle Push Notifications
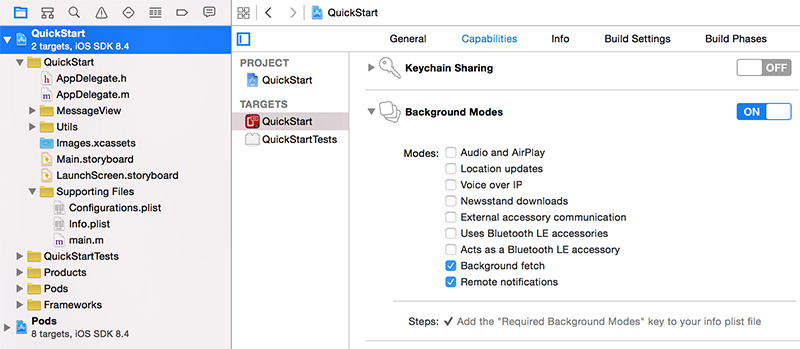
Select the project from the Project navigator. In the center panel select the target and then the Capabilities tab. Under the "Background Modes" option check the boxes next to Background fetch and Remote notifications.
In your Info.plist file make sure the bundle identifier matches the identifier you used when you set up the push certificate you set up in the previous section.

Import the MMX.h in your AppDelegate
Add the following code to - (BOOL)application:didFinishLaunchingWithOptions: in your AppDelegate:
//You need to change the bundle Identifier to match the one your push certificate is set up to work with.
//Code to register for notifications
UIUserNotificationSettings *settings = [UIUserNotificationSettings settingsForTypes:(UIUserNotificationTypeBadge | UIUserNotificationTypeSound | UIUserNotificationTypeAlert) categories:nil];
[application registerUserNotificationSettings:settings];
Add the follow callbacks and code to your AppDelegate:
- (void)application:(UIApplication *)application didRegisterForRemoteNotificationsWithDeviceToken:(NSData *)deviceToken {
[MMDevice updateCurentDeviceToken:deviceToken success:^{
NSLog(@"Device token updated.");
} failure:^(NSError * error) {
NSLog(@"Device token error = %@",error);
}];
}
- (void)application:(UIApplication *)application didFailToRegisterForRemoteNotificationsWithError:(NSError *)error {
NSLog(@"didFailToRegisterForRemoteNotificationsWithError = %@",error.localizedDescription);
}
- (void)application:(UIApplication *)application didRegisterUserNotificationSettings:(UIUserNotificationSettings *)notificationSettings {
//register to receive notifications
[application registerForRemoteNotifications];
}
- (void)application:(UIApplication *)application didReceiveRemoteNotification:(NSDictionary *)userInfo fetchCompletionHandler:(void (^)(UIBackgroundFetchResult))completionHandler {
//In the case of a silent notification use the following code to see if it is a wakeup notification
if ([MMXRemoteNotification isWakeupRemoteNotification:userInfo]) {
//Send local notification to the user or connect via MMXUser logInWithCredential:success:failure:
completionHandler(UIBackgroundFetchResultNewData);
} else if ([MMXRemoteNotification isMMXRemoteNotification:userInfo]) {
NSLog(@"userInfo = %@",userInfo);
//Check if the message is designed to wake up the client
[MMXRemoteNotification acknowledgeRemoteNotification:userInfo completion:^(BOOL success) {
completionHandler(UIBackgroundFetchResultNewData);
}];
} else {
completionHandler(UIBackgroundFetchResultNoData);
}
}
Set Up Your Application with Apple iOS Developer Program
The following steps describe how to configure your iOS App for push service with APNS.
You will need to be a registered member of Apple's iOS Developer program to obtain an APNS certificate.
- Sign in to the Apple Developer website.
- Click Certificates, identifiers & Profiles in the iOS Developer Program window.

- Click on Identifiers under iOS Apps.

- Register the messaging App ID by clicking + (add) to open the App ID registration screen.

Enter the App ID for the App ID Description (1) and the Bundle ID (2).
WARNING Do not create an App ID with special characters, such as @, &, or *).

Click Continue.
- Select the Push Notifications checkbox, and then click Submit.

Download Your APNS Certificate
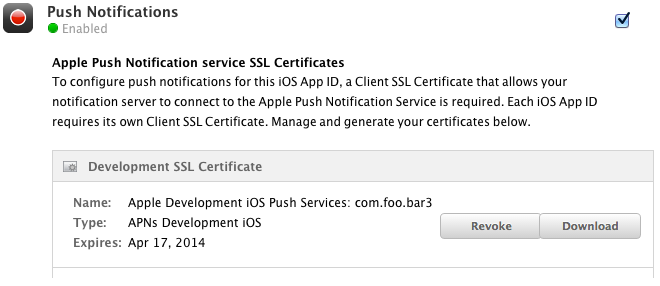
- Expand the application so you see two settings (Enabled and Configured) for push notifications with yellow or green status icons.

- Click Settings (or Edit, if push notifications have been previously configured).
Settings Availability: If Settings/(Edit) is not available, you may not be the Team Agent or an Admin. Only a Team Agent or Admin will be able to perform the remaining steps of this procedure. The Team Agent is the person who originally created the developer account.
- Perform the following steps if you need to enable the Push SSL Certificate; otherwise, continue to Renewing an APNS Certificate.
- Click Create Certificate for the appropriate SSL certificate type (development or production).

- Follow the instructions in the Add iOS Certificate Assistant screen, and then click Continue.
- Generate the APNS Push SSL certificate using the Certificate Signing request that was just created.
- Click Download to download the certificate. You may need to reload the page for this function to appear.
- Open the certificate to view the Keychain Access screen.
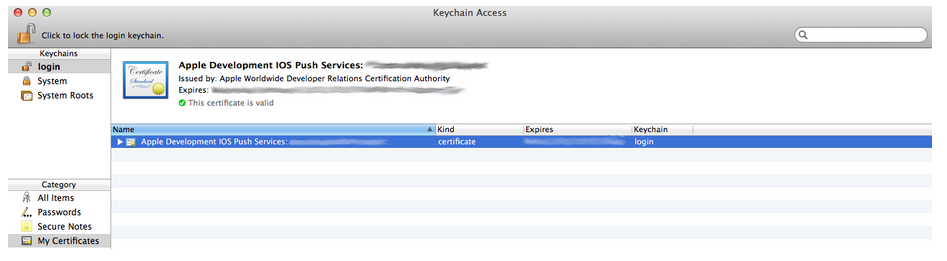
- Verify your certificate is listed under My Certificates. If not, verify it is listed under the iOS Apps screen.
Renewing an APNS Certificate
If you are renewing either your Development or Production Push SSL Certificate, follow the steps outlined above as if you were downloading the certificate for the first time. There is no need to revoke the previous certificate to make this change. Two production certificates are allowed at the same time, to allow you to continue using the old certificate while uploading the new one.
Export the Certificate as a .p12 File
Select the certificate that was just added to Keychain Access and select File -> Export Items... from the menu. Be sure to select My Certificates under the Category menu on the lower left-hand side, otherwise you will not be able to export the certificate as a .p12 file.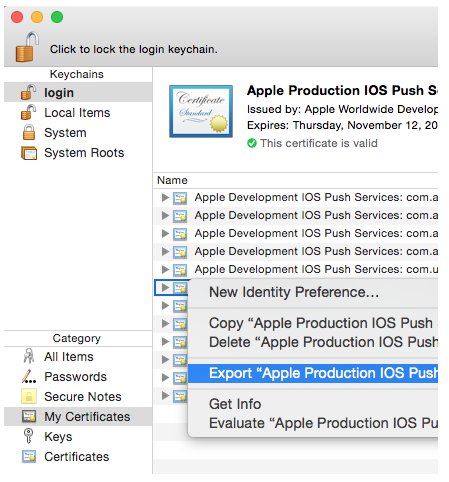
Save the Certificate using thePersonal Information Exchange (.p12) format. 
Useful Links
